您正在使用一款已经过时的浏览器!部分功能不能正常使用。
请尝试升级或使用 其他浏览器。
请尝试升级或使用 其他浏览器。
草莓苗移到地里面~会把其他植物都杀了吗
- 主题发起人 erichenry
- 开始时间


- 注册
- 2007-07-02
- 消息
- 1,802
- 荣誉分数
- 639
- 声望点数
- 273
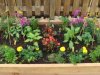
Build Raised Garden Bed
You don’t need an elaborate garden to enjoy fresh vegetables and colorful flowers. Consider installing a raised garden bed. All you need are a few materials, a small space and a few hours to complete this simple project.
PreparationA raised garden bed is a great alternative to traditional gardening. It allows better drainage, the soil warms more quickly in spring, and requires less maintenance than a traditional bed in the ground. And a small raised bed can be placed almost anywhere in your landscape. The raised garden bed described here is built with lumber. The sides are constructed of 2" x 4" lumber with 4" x 4" posts at the corners. The bottom is open to the ground. This is a basic container, but you can build your garden bed from almost anything—including stone, concrete blocks, logs or even just a pile of soil. Additionally, you can construct a raised bed with legs and a bottom—similar to a table—and place it on a deck for easy access. Whatever method you use, make sure you have at least 6" of soil for the plants’ roots to grow.
TIP: If you’re planting vegetables, do not use pressure-treated lumber. The chemicals in the lumber can leach into the plants and make them toxic to eat. Instead use untreated wood such as pine or cedar.
Selecting The Location
Choose an appropriate location for the raised garden bed. The location should have:
•Orientation to take advantage of the sun’s path and to minimize obstructions. Watch the site for the location of the sun in the morning and afternoon. Identify the source and duration of any potential shadows that may fall on the chosen site.
TIP: Vegetable gardeners often prefer orienting rows north-south with taller plants at the north end so they don’t obstruct the sunlight to smaller plants.
•Sufficient sunlight for what you are growing. Some vegetables, such as lettuce, prefer some shade during the day.
Also, they can be covered with cheesecloth spread over a simple frame.
•Easy access to both sides of the bed. If you build your bed next to a house or a shed, consider making it smaller so you can easily reach the far side of the bed.
Preparing the Site
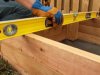
01 Use a level to make sure that the site you select is relatively level with slight drainage away from the container.
02 Clear the container area of sod and weeds.
03 Lay landscape fabric on the ground slightly larger than the raised container.
•You can cut off excess fabric after the container is in place.
Building the Container
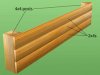
01 Cut the 2x4s and 4x4 posts to length.
TIP: 4x4 corners aren’t required for smaller raised bed containers. Instead, you can fasten corners from the inside or outside using angle brackets, available in the hardware section of Lowe’s.
02 Attach the first side 2x4s to two 4x4s. Make sure the 2x4s are flush with the top of the post. Check it for square, then drill pilot holes near the end of the boards and attach with screws.
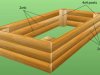
03 Build the opposite side the same way.
04 Add the other 2x4s to the ends of the constructed sides to form a box.
•Use a carpenter’s square to ensure the container is square.
05 Set the container in place on the landscape fabric. Make sure that the container is level.
06 Once the container is in place, cut and remove the excess landscape fabric with a utility knife.
Planting
01 Add growing soil to the container.
•If you have a compost pile, mix some into the soil. For tips on composting, watch How to Compost at Lowes.com/Videos.
•You can also add special fertilizers.
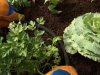
02 Add your plants with a hoe, garden trowel or your hands.
•Pull the dirt back, place the plant at the recommended depth and spacing, then cover the roots with soil.
03 Establish an irrigation plan.
•Surface watering with a garden hose will work, but can be wasteful and requires more time and effort. •If you prefer surface watering, consider using recycled water from a rain barrel. You can find rain barrel installation instructions at Lowes.com/Videos.
•A soaker hose will get water to the roots efficiently.
•Lay it along a row of plants, and cover with soil.

You don’t need an elaborate garden to enjoy fresh vegetables and colorful flowers. Consider installing a raised garden bed. All you need are a few materials, a small space and a few hours to complete this simple project.
PreparationA raised garden bed is a great alternative to traditional gardening. It allows better drainage, the soil warms more quickly in spring, and requires less maintenance than a traditional bed in the ground. And a small raised bed can be placed almost anywhere in your landscape. The raised garden bed described here is built with lumber. The sides are constructed of 2" x 4" lumber with 4" x 4" posts at the corners. The bottom is open to the ground. This is a basic container, but you can build your garden bed from almost anything—including stone, concrete blocks, logs or even just a pile of soil. Additionally, you can construct a raised bed with legs and a bottom—similar to a table—and place it on a deck for easy access. Whatever method you use, make sure you have at least 6" of soil for the plants’ roots to grow.
TIP: If you’re planting vegetables, do not use pressure-treated lumber. The chemicals in the lumber can leach into the plants and make them toxic to eat. Instead use untreated wood such as pine or cedar.
Selecting The Location
Choose an appropriate location for the raised garden bed. The location should have:
•Orientation to take advantage of the sun’s path and to minimize obstructions. Watch the site for the location of the sun in the morning and afternoon. Identify the source and duration of any potential shadows that may fall on the chosen site.
TIP: Vegetable gardeners often prefer orienting rows north-south with taller plants at the north end so they don’t obstruct the sunlight to smaller plants.
•Sufficient sunlight for what you are growing. Some vegetables, such as lettuce, prefer some shade during the day.
Also, they can be covered with cheesecloth spread over a simple frame.
•Easy access to both sides of the bed. If you build your bed next to a house or a shed, consider making it smaller so you can easily reach the far side of the bed.
Preparing the Site
01 Use a level to make sure that the site you select is relatively level with slight drainage away from the container.
02 Clear the container area of sod and weeds.
03 Lay landscape fabric on the ground slightly larger than the raised container.
•You can cut off excess fabric after the container is in place.
Building the Container
01 Cut the 2x4s and 4x4 posts to length.
TIP: 4x4 corners aren’t required for smaller raised bed containers. Instead, you can fasten corners from the inside or outside using angle brackets, available in the hardware section of Lowe’s.
02 Attach the first side 2x4s to two 4x4s. Make sure the 2x4s are flush with the top of the post. Check it for square, then drill pilot holes near the end of the boards and attach with screws.
03 Build the opposite side the same way.
04 Add the other 2x4s to the ends of the constructed sides to form a box.
•Use a carpenter’s square to ensure the container is square.
05 Set the container in place on the landscape fabric. Make sure that the container is level.
06 Once the container is in place, cut and remove the excess landscape fabric with a utility knife.
Planting
01 Add growing soil to the container.
•If you have a compost pile, mix some into the soil. For tips on composting, watch How to Compost at Lowes.com/Videos.
•You can also add special fertilizers.
02 Add your plants with a hoe, garden trowel or your hands.
•Pull the dirt back, place the plant at the recommended depth and spacing, then cover the roots with soil.
03 Establish an irrigation plan.
•Surface watering with a garden hose will work, but can be wasteful and requires more time and effort. •If you prefer surface watering, consider using recycled water from a rain barrel. You can find rain barrel installation instructions at Lowes.com/Videos.
•A soaker hose will get water to the roots efficiently.
•Lay it along a row of plants, and cover with soil.
附件


- 注册
- 2009-06-27
- 消息
- 2,078
- 荣誉分数
- 376
- 声望点数
- 93
- 注册
- 2007-07-02
- 消息
- 1,802
- 荣誉分数
- 639
- 声望点数
- 273
5月初的时候沃尔玛的土特价$0.69,买了5包。
不是吧 1刀居然还有特价 这种消息应该早点通知
用这个的话草莓和其他植物就分开了 与地面也是分开独立的 跟就算乱跑也出不了这个范围
面积会比室内大很多
记住要买黄色的天然木头2X4X10也就1刀多一点 超便宜
警告:不要买绿色的种植蔬菜水果 花的话可以
[ame="http://www.youtube.com/watch?v=mPrMvItUIuQ"]YouTube - How to build a Raised Bed Garden‏[/ame]
[ame="http://www.youtube.com/watch?v=w0WX1CEopQI"]YouTube - How to Build a Raised Vegetable Garden Bed‏[/ame]
[ame="http://www.youtube.com/watch?v=kFCBWWYp_CY"]YouTube - How tall should I build my Raised Bed Garden? How high should the soil be?‏[/ame]
[ame="http://www.youtube.com/watch?v=p1pR6akwlIk"]YouTube - Raised Garden Bed: Natural Cedar‏[/ame]
[ame="http://www.youtube.com/watch?v=SLlx9NlsMsM"]YouTube - How to Build a Raised bed Garden out of Douglas Fir or Redwood and Cedar‏[/ame]


")

